Features:
MAGLOC®
1. Extended
Magazine Release for Springfield XDm pistols (9mm, .40 S&W
and 45ACP caliber. Does not fit XD)
black color
Price: US $30.50
2. Extended Magazine Release for XD 9mm and .40
S&W caliber (Does not fit XDm)
black color
Price: US $30.50
steel color
Out of Stock
Price:
3. Extended Magazine Release for XD .45 ACP caliber
(Does not fit XD 9mm or XDm)
steel color
Out of Stock
black color
Price: US $30.50
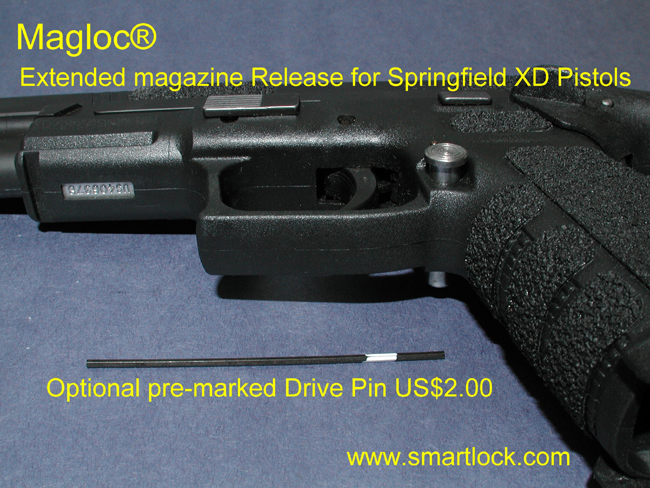
4. Optional Pre-Marked 1/16" (1.5mm) Drive Pin
Price: US$2.00I
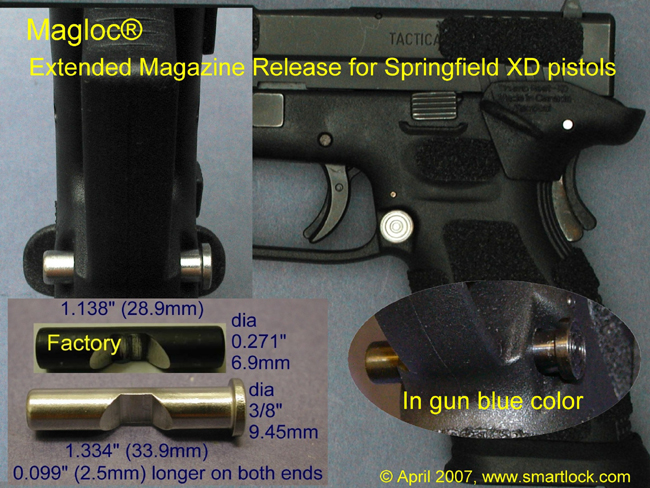
Compare with the factory mag release, this design sticks out 0.099" (2.5mm) from both sides with the contact area of one end enlarged by 87% to speed up magazine release. For shooters with smaller hands; competitors; duty or self defense that require fast magazine release, this device is a must have.
Features:
1. Enlarged release button contact area by 87%.
You feel less pressure in releasing the magazine.
2. Release button can be installed with the big end on the left or right hand
side of the pistol.
3. Release button extended by the same length on both ends - 0.099" (2.5mm) and
fits most holsters.
4. Checkering on both ends are the same as the original to maintain muscle memory.
5. Made of steel (same as the original magazine release) and can be
gun blued
by most gun blue chemical.
Specification:
1. Fits all Springfield XD standard; compact in 9mm
or .40 S&W cal pistols.
(Separate one for XD .45 ACP pistol and XDm)
2. Total weight:
9mm and .40 S&W - 0.33 oz (9.4 gram)
.45 ACP - 0.32 oz (9.1 gram)
3. Length of the original mag release: 1.138 “(28.9mm).
Length of this mag release: 1.334" (33.9 mm).
4. Original diameter: 0.271" (6.9mm)
Big end of this mag release: 3/8" 9.45mm)
Installation:
Note: If you are not sure of the installation,
please get the help of a qualified gunsmith. Wear eye protection and make sure
the gun is not loaded before starting.
Tools required:
1. One 1/16" (1.5mm) drive punch. First mark off a length of 0.39" (10mm) to
prevent over driven.
**Optional pre-marked drive pin as shown can be purchased
at US$2.00.**
2. One light weight hammer.
The Installation:
1. Separate the slide from the frame.
2. Use the drive punch to drive out 0.39" (10mm) length of the " Magazine Catch
Pin" from the right hand side as shown on (Photo 1).
Do not over drive and
release the whole "Magazine Catch" as reinstalling it is a major headache.
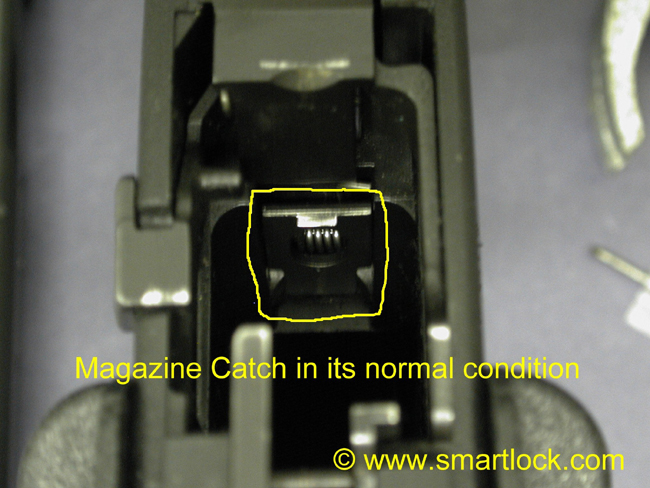
3. Photo 2 shows the "Magazine Catch" in its correct partially released stage.
4. With one finger pressing the top of the "Magazine Catch" push the magazine
release out from the frame as shown on (Photo 3).
5. With one finger pressing the top of the "Magazine Catch" push the small end
of the extended magazine release into the frame as shown on (Photo 4). This
installation can be done from the right or the left hand side of the frame as
the big end can be installed on either side.
6. With one finger pressing the top of the "Magazine Catch" to its original
position, use the light weight hammer to tap the "Magazine Catch Pin" back into
its original position (Note: use the drive pin to make the final adjustment).

Important: After installation, holster test and test fire your pistol in various shooting positions and making sure that your hands would not accidental activate the extended magazine release.
Some feedbacks from our customers:
Great item, installed in
minutes. Easy to do business with.
Mark S., TX
Excellent product, fast
delivery, thanks!
Todd K, Alberta, Canada
Great Item! Fast shipping!
Elizabeth M.. TX
Back to:![]()
![]()